Monday, 13 June 2016

Pattern blocks: Bodice

Today i have been making my own pattern blocks so i have the made to measure foundations of as many different clothing patterns as i can imagine! I have been using a great book called 'How to use, adapt and design sewing patterns' by Lee Hollahan.

The book contains basic pattern blocks for a bodice, sleeves and skirt. Firstly take some measurements of your body so you know what size pattern blocks to cut out. Then, you simply scale them up onto some pattern drafting paper in the correct size for you. Today i have worked on the bodice. I found that the length of the shoulder was going to be too long for me so i adjusting the pattern at this point. Once i was happy with my paper pattern i added 1.5cm seam allowance and drew the design onto some medium weight calico:


Next i sewed up all the darts and then finally attached the pieces together at the shoulders and side seams:


Now it was time to try it on and check how close the fit was.... turns out the neck hole was too small...


I cut into the fabric to make the neck slighter wider. The fabric i removed from the toile was then used to update the paper pattern.


Time to try it on again...


 Ta da! Now we have a very well fitting bodice :) The paper pattern can now be used as the basis for many different types of tops and dresses that will fit me perfectly every time. The next task is to draft some sleeves....


Sunday, 3 January 2016

Embroidery bird

This year Santa brought me my first embroidery kit! This is a Nancy Nicholson kit that, once finished, can be framed or turned into a cushion, or whatever you like.


The kit come with a printed cloth with markings showing you where to sew. You also get, your needle, threads and a guide to the different embroidery stitches. I found i had to google some of the stitches to get a clearer idea of how to do them. Here's my progress so far...


The kit came with a light grey for the back ground but i've decided to keep it bright and go with green instead.


Still undecided what to do with it when it's finished, leaning towards framing it to protect it from cats....

Patchwork duvet cover

The only patchwork i have done was a hand made quilted blanket using the Victorian paper piecing method. It was a very long project and very time consuming but I'm tempted to do it again, the final results were very pleasing. In the meantime i thought a patchwork duvet cover made using my sewing machine would be a much speedier option. It was indeed faster, however very repetitive and boring. I hope i don't forget that and embark on another patch work machine project....

The duvet cover was to match my green bedroom so the first task took many weeks: finding the right fabric.


I decided to try a basic chevron design thinking i'll start with something easy and advance to a more technical design for my next project (won't be doing that in a hurry). My chevrons were compiled of triangles which i cut out using a rotary cutter. Firstly i cut some plain cream coloured squares (25x25cm) and the same again in my patterned fabric then overlocked them right sides together.


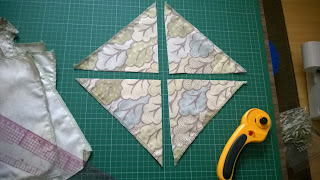
I then cut through the two fabrics diagonally to get four squares; half plain half patterned.


Then i lined up the colours to make a chevron.


I made up eight rows which gave me a finished piece measuring two metres by two metres. I took the cream fabric from a pre-made duvet cover and i kept the back half to add to my new chevron front. I also had the strip of poppers to re-use!


Final project modelled by Billy :)