Sunday, 15 March 2020

McCall's M7332 spring blazer Part Two

The next stage was to see up the lining in the same manner as the front and back panels. They were then placed right sides together with the outer fabric and sewn together


Leave the arm holes free then you can flip the whole thing the right way around. I then understitched as much as I could to stop the lining from rolling out and being visible from the front. Under stitching is always worth the effort to make your garment look neat and we'll made! I overlooked the arm holes to prevent fraying whilst I hand stitched the sleeve linings.


I think I would have found attaching the sleeves really difficult if I didn't have the dress form. If you don't have one, I'd advise hanging the jacket on a hanger for this bit. It'll ensure you aren't attaching the lining shorter than the outer fabric as the sleeve won't hang well if you do.

And here's the finished piece! Just waiting for some nicer weather to give it it's first outing now!!


Thursday, 20 February 2020

McCall's M7332 spring blazer Part One

It's been a long time since my last post...been enjoying married life too much 😉 I've decided to kick off 2020 with a blazer. I've never made one before but there's a gap in my wardrobe for a light jacket this spring


I chose image D and was going to also go for the same colour fabric until I remembered how much I love the colour mustard.....and tweed....  A quick eBay search and I found the perfect colour combo. It's a bit louder than my usual style but, let's be brave...


And you gotta have a funky lining!


Due to eating too many pies the largest size in this pattern was a little tight in me 🙄 so I spent some time making a the front and back panels just a couple of cms bigger. Ideally I wanted to be able to wear the blazer over my hoody. I made the resized pattern out of cotton so i could easily reuse it.


I decided on making mustard the main colour and using grey as the accent. I also top stitched my seams to make the finished look more professional. I also like the detailing too.


So far so easy. I moved onto the collar next. The under collar was cut on the bias and has stretched quite a lot. I managed to manipulate it back to the size and shape of the paper pattern so I could add the fusible interfacing but in hindsight I should have left it attached to the paper pattern to make this process a bit quicker.


I've basted the collar to the jacket and it will eventually be enclosed within the lining. (Yes the wedding dress from 2018 is still waiting to be mended and stored away 🤦)


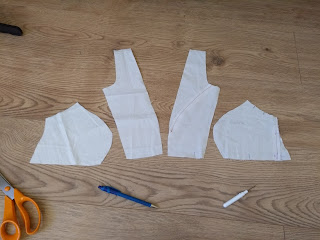
The sleeves are also ready to go. They were a bit fiddly as they are half one fabric and half the other and are joined in a triangular shape. If you take the time to pin it first it's quite straightforward.


Sewing machines are now switched off while I wait for the lining fabric to be delivered....


Saturday, 22 December 2018

Making my wedding dress: Part five


It's been a while since i last posted because the wedding date crept up on me and i decided to make some pretty last minute changes to the dress which kept me rather occupied!

So the stage i was up to when i last posted was the corset. I made the loops first of all and then attached them to a strip of fabric. I sewed over them several times as i was worried that when pulled tight i might break a stitch here and there. By the time i was finished they were going nowhere!


I sewed the loop strip to the seam allowance of the corset so i didn't have any stitches visible on the outside:


Next i moved on to the the straps and also added a modesty panel which i inserted boning into so it wouldn't sag


Now the satin part of the dress was finished i turned my attentions back to the lace. Initially, the lace bolero was a separate piece to the dress but i started having second thoughts about this just a few weeks before the wedding. I wanted the dress to be fitted at my waist and the bolero hung loose but i just couldn't come up with a way of making it more fitted other than taking a pair of scissors to it.... So that's what i did. I chopped quite a bit off the bottom of the bolero and then stated to attach it to the bodice of the dress


I also made a bow to go around the waist for a bit of extra drama at the back :) and because i felt i'd finished with some time to spare i bought a load of chiffon and made an over skirt. Given more time i think it would have got bigger and bigger!! I'm glad for deadlines....


A Little bling for the belt....

Hanging up all ready to go the night before....


And here's the big day!!!


Sunday, 18 March 2018

Making my wedding dress: part four

My wedding dress will have a laced up corset and pleated skirt as the base. I chose some ivory satin from Truro fabrics after ordering lots of different samples through the post. I chose this particular fabric because it had the structure I was after and the colour together with the shine was like ice cream. Delicious 😋

 I made the corset up in three fabrics. The satin for the front, an interlining of cotton on to which I attached the boning and then a lining fabric.

 I then used some more lining fabric to make a petticoat. I didn't do this the full length that intended on making on making the outer skirt because I thought it'd get wrapped up in my legs once I took my hoop off!
 I next draped the satin around the bottom of the corset with my hoop beneath it so I knew it would fit around it. I tried to match the pleats up with the seam lines of the bodice. I then sewed the two layers of the skirt to the top two layers of the bodice. I left the bodice lining free so I could hand sew this down later and encase all the raw edges.


The next step for the corset will be the all important back. This is something I've not done before so I've been researching and planning it out in my hair before I attempt it....

Making my wedding dress: part three

Still practicing techniques I finished of my mocha corset and skirt... I made some bias binding to neaten the top of the corset and addef a horsehair braid to the hem to add some shape and structure:


Once it was finished I didn't think I'd get the chance to wear it anytime soon but luckily for me I was invited to a posh do last minute and had the perfect outfit 😁 
Since then... We've booked a venue and it's game on! I won't be waiting around to start making my dress tho, not now I have some practice under my belt. I've always been a fan of lace and decided I'd make a top out of tulle which I could attach lace to so I set to work on that next. I already had a pattern of drafted that I knew I could use as a template.

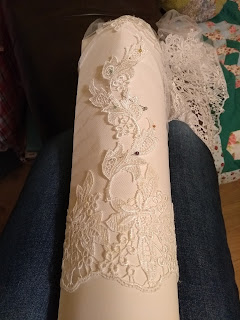
I searched for a while to find the lace I wanted to use and finally settled on a lace from Minerva craft. It had a good repeating pattern I thought I'd be able to cut and place well. I started by covering the bodice and then embellished the sleeves.


The lace top is still open at the back I considered whether I could attach it to the dress but it's just too delicate, I don't want it to come under any tension. I can't think of a way to secure it in yet but I'm working on it. Maybe a broach, maybe little pearl buttons... Anywho, with this bit 90% done its time to start the dress itself...


Monday, 1 January 2018

Making my wedding dress: Part two

 My first attempt at a bodice was lacking structure so I thought what kind of bodice will give me structure? A corset of course! Maybe I could have drafted a corset from scratch? I dunno, what I do know is one of my trusty sewing bee books already has a corset pattern I can use!

I made the corset up in some muslin first with the plan of making alterations to it if necessary and then using the pieces as my pattern. As it turned out the first attempt fit well so I made it up in some satin.

I'm awaiting the boning now, channels are all in place ready. Prior to that I think I'll attach the bias binding to the front top edge. Then I'll be able to insert the boning all the way to the top before hand stitching the back of the binding. The original pattern has a lace up back but I prefer to use an invisible zip.


Whilst I'm waiting for bits and bobs in the post I moved onto the skirt. I like the idea of having some big pleats, maybe all the way around or perhaps starting on the hips. I've looked at millions of pics online and big box pleats just catch my eye.


Im going to make my wedding dress floor length. This outfit is purely for trying out some techniques I've never done before. I decided to cut the hem to mid calf left just to take a bit of drama out of it and I may stand a chance of actually wearing it... Somewhere...

I've added a waistband and invisible zip to the skirt, there's some horsehair braid on order to give the hem some structure. This is another thing I've never done before so learning lots with this project. My next posts will cover finishing off the bodice and the skirt hem. The grand finale will be adding some lace to the mix. I have a few more YouTube videos to watch before then though!!!

Making my wedding dress: Part one

Sew..... This happened!

Obviously my thoughts quickly turned to making a dress!!! I pretty much jumped straight in and starting drafting a bodice using my dress form.

 My original idea was a satin bodice which I'd then drape tulle over.


 I added some shoulder straps partly for stability but also to have something to anchor the tulle to. I had some mocha coloured satin which matching chiffon knocking about so decided to play around with draping. The way the bodice is connected below the bust requires gathering and I quickly realised this wasn't going to give the sleek under bodice I was after.


 It was back to the drawing board to adjust that bodice and take out the gathers!


I spent many frustrating hours trying different ways of draping the fabric. Having never done this before I really was winging it. I just couldn't get the tension right; the chiffon was either too taught and pulling on the bodice underneath or it was too slack and looking like a baggy mess. In hindsight, chiffon wasn't the best fabric for this style and I was planning of using tulle anyway, with it's sturdier structure I might have achieved what I had in mind... However I got frustrated and decided to start all over again with a different look. We'll, I haven't set a date yet so where's the hurry? 😂